Print bleed has become a necessary component in creating professional-looking print designs, ensuring that the artwork extends all the way to the edge of the page without any awkward white borders. Misaligned prints with white or blank edges can be quite unprofessional and distracting, but with the addition of print bleed, you can avoid these awkward, unseemly edges.
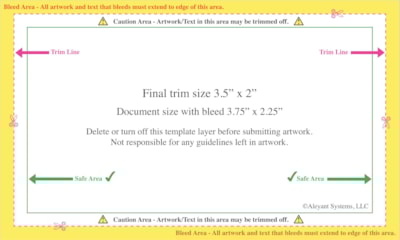
To achieve the best results in digital printing, adding a print bleed should be a mandatory step during the design process. It's recommended that you add .125" of bleed on all sides of your design to ensure that there is enough space to accommodate for any inconsistencies or shifting that may occur during the printing process. This additional margin guarantees that your artwork's print margin appears to be an extension of your document's core design.
Wondering how to add bleed to your designs? It's easier than you might think. Popular design software - such as Adobe Illustrator, Photoshop, and InDesign, among others - feature straightforward added bleed capabilities, which can be customized as necessary to achieve the best results with your designs. Our experts have put together easy-to-follow instructions to help guide you through the process, so you can add print bleed to your digital designs and create high-quality printed results that stand out above the rest.
How to Adding Bleed in Popular Design Applications
 Canva:
Add bleed to your document: Canva, by default, will add bleed to your document. To see the bleed line in your document, click on "File > View settings > Show print bleed"
Saving your document as a PDF with bleed: Click on "File > Download". When the Download dialog appears, under "File Type" select "PDF Print" and select the "Crop marks and bleed" checkbox. Finally, click the "Download" button.
![]() Video: How to add bleed in Canva!
Video: How to add bleed in Canva!
 Adobe Illustrator:
Add bleed to your document: Click on "File > Document Setup > Bleed". Then enter .125” as the top, bottom, left and right values before pressing “OK”.
Saving your document as a PDF with bleed: To save a PDF with bleed in Illustrator, first open your Illustrator file and go to File > Save As. Choose PDF (*.PDF) as the Save as type, select a location and enter a filename for your PDF. In the Save Adobe PDF dialog box, select the Adobe PDF Preset that best matches your output. Click on the Marks and Bleeds tab on the left-hand side of the dialog box. In the Bleed section, enter the amount of bleed you want in your PDF – the standard bleed size is .125 inches. Click OK to close the dialog box and then Save to save your PDF with bleed. These simple steps ensure that your PDF includes the specified bleed, making it ready for printing.
 InDesign:
Add bleed to your document:The process for adding bleeds when using InDesign is essentially the same as with Adobe Illustrator. Go into “File > Document Setup > Bleed” and enter .125” now press OK - and your design should have included bleeds at this point!
Saving your document as a PDF with bleed: Navigate to File > Export as PDF. In the Export As dialog box, choose a location to save the PDF and name the file. You can choose a preset that matches your output needs here or even customize the settings using the 'Show All Options' button. After selecting your desired settings, click on the 'Marks and Bleeds' tab on the left-hand side of the Export As dialog box. Under the Bleed and Slug section, ensure that the 'Use Document Bleed Settings' checkbox is checked. Finally, type the value of the bleed you want to include in your PDF in the 'Bleed' field and click 'Export'. With these steps, your design document should now be exported as a PDF with the necessary bleed area for printing.
At Allegra, we highly recommend adding bleeds to all designs so you can get the most out of our printing capabilities - or any other printing service - because they give you consistent results while making sure no white edges appear along the cut lines of your printed product. For exceptional quality prints every time, be sure to use .125“ of print bleed!
If you need further assistance, please do not hesitate to contact Allegra at [email protected] or 775-829-7768.